Zone Photos
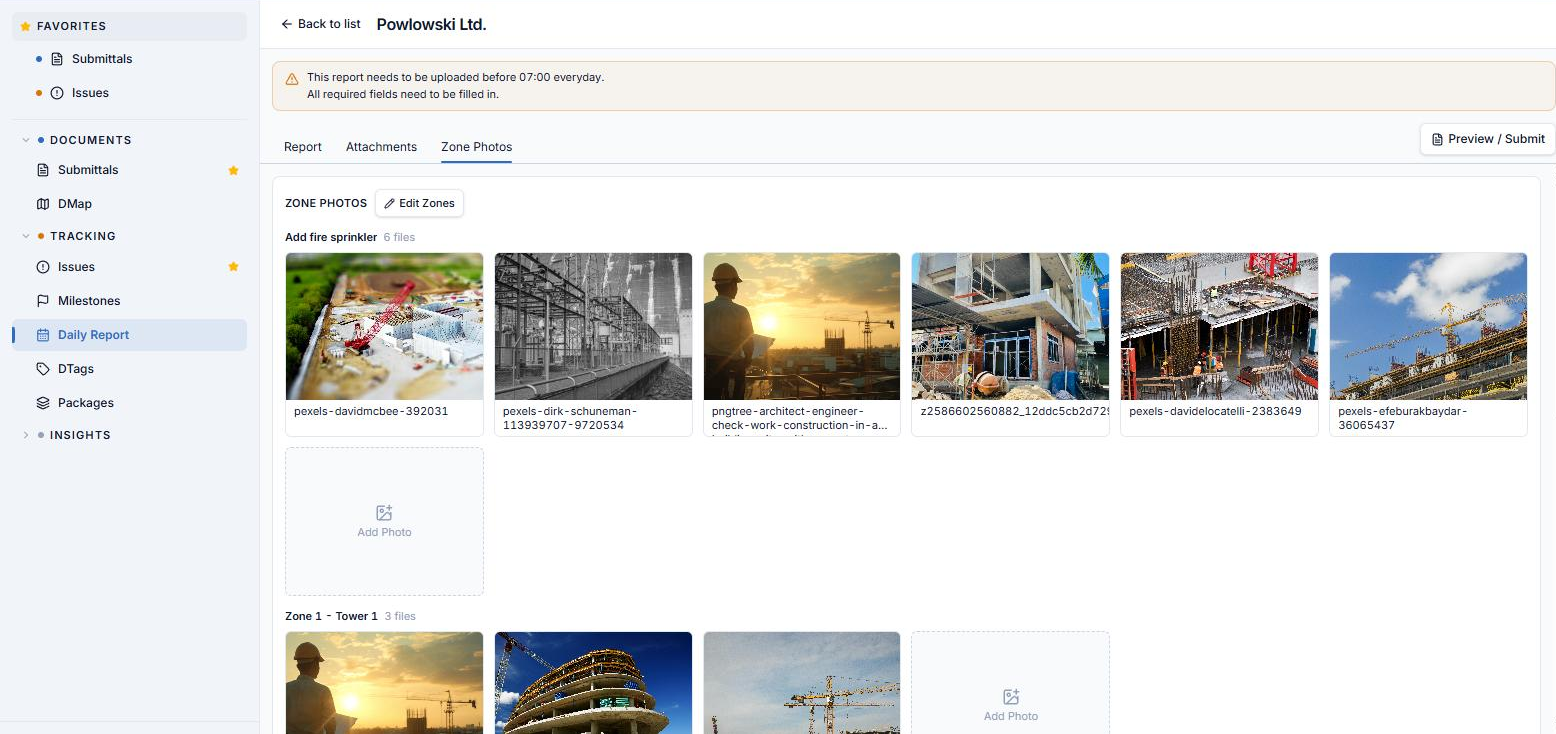
Site photos are filed against a zone, because the compiled report prints them zone by zone under each zone's heading. The Zone Photos tab renders one section per zone currently on the report, in the order they will be printed.
What a zone is
A zone is a node in the project's shared DTag tree — not a Daily Report-only list. Creating a zone means creating a DTag node.
Which nodes are offered as zones is set by the zone scope in Project Settings ▸ Daily Report:
- The configured node's children, at every depth below it, are the available zones.
- The configured node itself is never a zone — it is the branch heading.
- If no node is configured, the zones are the nodes directly under the project's DTag root.
- If the configured node has no children, that node becomes the only available zone.
Every zone edit you make from this tab writes back only inside the configured branch. The rest of the project's DTag tree is left untouched.
How zone names are displayed
A zone's name appears two different ways, on purpose:
| Where | Format | Example |
|---|---|---|
| The Select Zones picker | Full path, one line | Ground Floor / Lobby |
| Everywhere else — section headings, the photo viewer, the zone selector, Edit Zones rows | Leaf name only, full path on hover | Lobby |
The flat picker needs the full path to tell apart two zones that share a leaf name under different branches. Everywhere else the zone is already decided, so the path would only spend width.
The tab
The heading area carries exactly one action: Edit Zones (pencil icon). There is no add-photo, delete-zone, or reorder control at this level.
Below it, one section per zone on the report, in print order. Each heading shows the zone's leaf name and a file count — for example Lobby · 4 files.
A zone that has been taken off the report does not render here, even if it still holds photos. When the report has no zones at all, the tab shows an empty state pointing you at Edit Zones.
Adding photos
Photos go straight into a section — there is no separate "add photos" screen and no staging step.
- Drag and drop files anywhere inside a zone's section to file them to that zone. The section highlights with a blue dashed border while you drag over it.
- Browse — an empty section shows a large dashed drop card; a section that already holds photos shows a small dashed + tile at the end of its grid. Both open the file picker.
- The file name, with its extension stripped, becomes the photo's starting caption. You can edit it afterwards in the viewer.
- Non-image files included in a drop are silently ignored.
A dropped or chosen file is on the report immediately. A file dropped into the wrong zone has to be moved or deleted afterwards — it cannot be caught before it lands. Deleting a single photo has no undo.
Working with photos in a section
| Action | How |
|---|---|
| Reorder within a zone | Drag a tile, or use its ◀ / ▶ control to shift it one position |
| Move to another zone | Drag the tile onto that zone's section — or use the viewer's Zone selector (below) |
| Delete | The 🗑 control on the tile |
| Open the viewer | Click the tile |
The move and delete controls appear on hover over a tile.
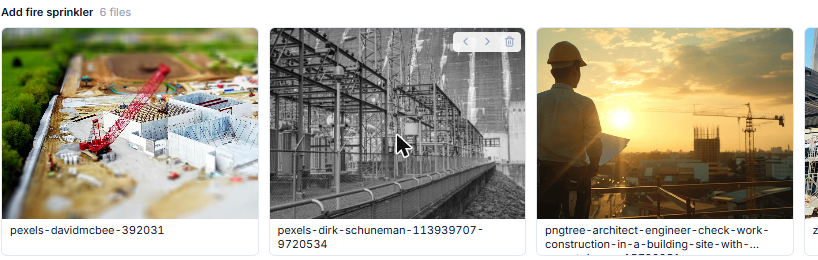
AECIS tells the two kinds of drag apart by what the drag carries: a tile already on the report is a move, files coming from outside the browser are an upload. Neither can be mistaken for the other.
The Edit Zones panel
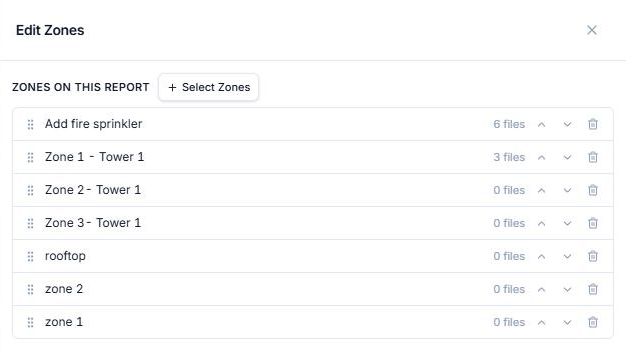
Clicking Edit Zones opens a right-side slide-over of the same name. It holds a Select Zones button plus the report's zone list in print order.
Every action writes to the report immediately — there is no Done or Save button. Close the panel with ✕ or by clicking the overlay; there is nothing left to confirm.
Each row carries a drag grip, the zone's leaf name, a file count, and ▲, ▼, 🗑 buttons.
Reordering zones
This panel is the only place a zone's print order can change. Three ways:
- Drag a row by its grip — the list reflows live under the pointer.
- Use the ▲ / ▼ buttons.
- Focus a row's grip and press the Up / Down arrow keys.
Removing a zone
One click. No confirmation and no block — a zone still holding photos is removed exactly as easily as an empty one. The delete button's tooltip tells you how many photos will be kept.
What removing actually does:
- It takes the zone's section off the report only.
- Its photos are kept, still tagged to that zone, just hidden while the zone is off the report.
- Adding the zone back makes its section reappear with those photos in their original order.
- The DTag node is never deleted by this action — the zone stays selectable in Select Zones.
The Select Zones picker
Opened from the Select Zones button inside Edit Zones. This is the only way to add a zone to the report.
- It shows the configured DTag branch as a tree, with no row for the branch's own root node.
- Every zone is checkable, with no locked rows. Zones already on the report show pre-checked; unchecking one removes it from the report (photos preserved, exactly as above).
- Applying your selection is a delta: newly checked zones are appended to the end of the report's zone list, and the order you already arranged is left untouched.
- A search field narrows the tree.
- A pencil icon opens tree management — create, rename, delete, move, and indent nodes directly in the branch. A newly created zone is automatically checked and added to the report.
- Creating a zone at "top level" means the zone list itself — the configured branch's direct children — not the project's DTag root.
- When the branch is empty, the picker shows a single Add Zone button to create the first node.
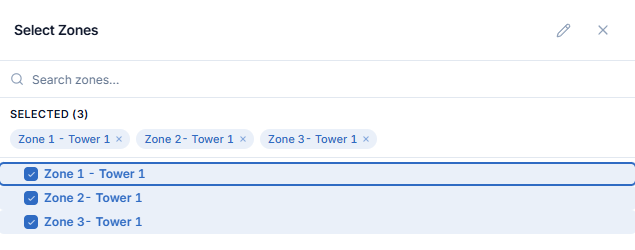
The two names are deliberately close. Edit Zones edits the report's own zone list — reorder and remove. Select Zones, nested one level inside it, adds zones from the project's DTag tree.
The full-screen photo viewer
Clicking a tile opens a full-screen dark overlay — the same preview experience used by the Submittal and Issue document previewers, so zoom, pan, pinch, and double-click-to-reset behave identically across modules.
A right-side info panel sits alongside the enlarged photo:
| Control | Notes |
|---|---|
| Caption | Up to 160 characters, with a live n/160 counter |
| Zone selector | Moves the photo — see below |
| Uploader and upload time | Read-only |
| Delete | Removes the photo (no undo) |
Navigation is scoped to the current zone. The counter (2 / 3), the prev/next arrows, the Left/Right keyboard arrows, and the bottom filmstrip all cycle only through photos in the zone you opened — matching the way the compiled report groups them.
- Keyboard arrows are suppressed while the caption field has focus, so typing does not jump photos.
- Escape closes the viewer. The page behind it does not scroll while it is open.
Moving a photo to another zone from the viewer
Changing the Zone selector moves the open photo immediately — this is a move, not a filter or a preview. The photo stays open and the gallery re-scopes to the new zone's photo set right away. A "Moved to …" banner confirms it.
Undo on that banner restores the photo to its exact original slot in its original zone — not appended to the end. If you edited the caption after moving, Undo keeps that edit; only the zone and position are reverted.